Chat with live agent
Table of contents
Overview
The SDK provides the tools to create and start a chat which will be answered by a live agent. Both chat parties should be connected during the chat session.
BoldAccount
Use this account to create live chat sessions with an agent.
With the account you can configure and set chat and user details, set session parameters, like destin department, preffered language, etc.
Creating account
val account = BoldAccount(API_KEY)
- API_KEY - As was created on the admin console.
Configure chat session
Chat session and details can be configured by the account.
User details can be provided for the chat session, and will be available for the receiving agent to view.
- extraData - Detailes about the user and the current chat session. The
extraDatadetails will be used to fill the prechat form if enabled, and will provide the agent some details about the user.account.addExtraData(VisitorDataKeys.FirstName to "Ando", VisitorDataKeys.LastName to "Roid", VisitorDataKeys.Email to "a@gmail.com", ...) -
securedInfo - An encrypted secured string that was applied to the specific access key in order to validate the chat origin on creation.
- VisitorId - Identifies the user. When provided on the account session, the created chat will be added to the same user account chats history. The same id will be used on the new chat.
account.apply{
    // adding extraData:
    addExtraData (SessionInfoKeys.Department to BOLD_DEPARTMENT,
        SessionInfoKeys.FirstName to DemoFirstName,
        SessionInfoKeys.LastName to DemoLastName
        ...)

    // adding secured info, in case of validated chats creation:
    info.securedInfo = "..."

    // Create a chat that relates to an existing user:
    info.id = VISITOR_ID
    //OR
    info.visitorId = VISITOR_ID
}
Listening to account updates
In order to get account session updates, like visitorId, chatId, details that were filled by the user on the prechat, etc, an implementation of AccountInfoProvider should be set on Chatcontroller.Builder. Once session data gets updated, the AccountInfoProvider.update method is called.
val chatController = ChatController.Builder(context)
                    .accountProvider(accountInfoProviderImpl)
                    ...
                    .build(account,...)

// on accountInfoProvider impl:
override fun update(account: AccountInfo) {
    // fetching chatId:
    account.info.chatId

    // fetching visitorId:
    account.info.visitorId
}
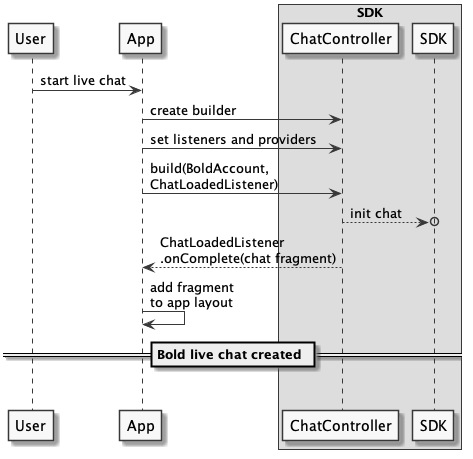
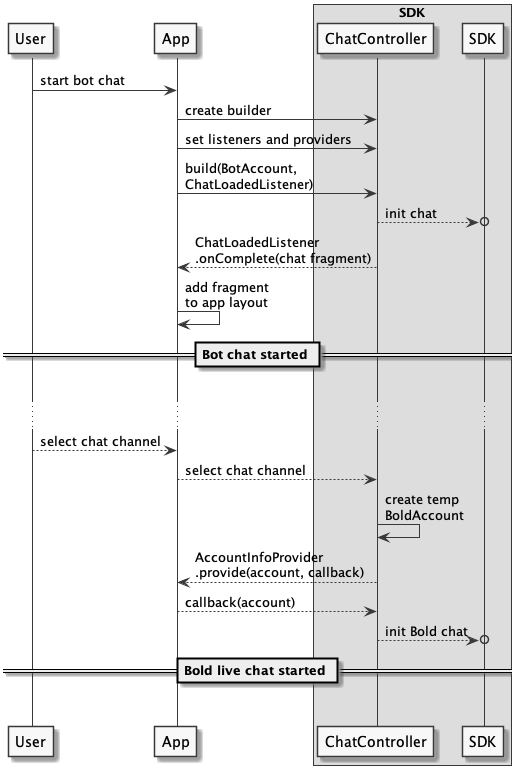
Start a live chat
The SDK provides the option to start a live chat, or escalate to live chat from a chat with AI.
Start Bold live chat
-
Create a
ChatControllerwith BoldAccount.val account = BoldAccount(API_KEY) val chatController = ChatController.Builder(context) .build(account, ...) -
Use an existing
ChatControllerand callchatController.startChat/chatController.restoreChatwith a BoldAccount.val account = BoldAccount(API_KEY) chatController.startChat(account) // or chatController.restoreChat(account = account)
Escalate to Bold live chat from chat with AI
Chat escalation is done when the user selects a Chat typed channel configured on the Bold360ai console, from a bot response options.
In case the hosting App implements the AccountInfoProvider, the AccountInfoProvider.provide method will be called with a basic BoldAccount, according to the data provided from the channel. The provide method call, enables the App to configure what ever needed for the live chat session.
If
AccountInfoProviderimplementation was not provided, the chat will start with the created BoldAccount as is.
Live Chat continuity
Live chat continuity means to be able to relate chats to the same user. The agent can then see all the user’s chats history.
-
There is no option to reconnect to a disconnected chat (connection was closed), evan if was not “Ended”.
-
A chat will remain active, and can be reassembeld (chat window reopen and history loading), evan if the chat window was closed, as long as it stays open in the
ChatController, otherwise a new chat should be started. -
When chat was disconnected for more than 5 min, the chat will be ended on the agent side, and eventually on the user side. If chat was closed on the agent side, but on the user side was not yet failed with an error, at this point, if users device got reconnected, the chat may be continued.
How to configure
In order to relate chats to the same user and create some kind of continuity of user chats, you need to pass the visitorId value that was created on the first chat, for this user. This value should be configured on the BoldAccount session details.
Chats history as it displayed on the agent workspace, is not the same as the history displayed on the mobile chat window. The history which displayed on the chat, depends on the hosting App implementation.
BoldAccount(API_KEY).apply{
    info.visitorId = SAVED_VISITOR_ID
}
Check how to fetch the visitorId on first chat.
How to
-
Define chat branding strings language.
account.info.language = "FR-fr" -
Destine a chat session to a specific department.
account.info.department = DEPARTMENT_ID -
Create a chat without displaying the prechat form.
account.info.skipPrechat = trueoraccount.skipPrechat()Notice: If the prechat form is being skipped, you can still send user details via extraData.